Wednesday, October 2, 2013

New Alpha Trailer!

We just posted a new trailer showing off all our recent progress!

Check it out!


We also revamped out Greenlight concept page with new screenshots, descriptions, and of course the shiny new trailer. Please take a look and rate/favorite us :D

or Click Here

Wednesday, August 14, 2013

Another day. Another new level.

After several Jams of tidying up old levels for various showcases, we have finally had the chance to create a new one!

We went from this sketch in MS Paint:


To this first draft in L3DT:


And ended with this final landscape in Unity3D:                         
                               

We are very excited for the mission we have planned for this level. Here the Tumbleweed will come face to face with a new foe. Who is she? What does she want? And what's with all the sweet talk she's sending on over to dear old Sneaky Pete? Not quite sure I want to know the answer to that, but more to come soon!

Wednesday, July 3, 2013

Ride The Rails: With Oculus Rift!

Needless to say, here at Dirigiballers, we're excited about the Oculus Rift and the new opportunities it brings for immersive gaming... and our development kit finally arrived! This past weekend, we imported the Unity plugin and took it for a spin. If you've got your own headset, swap this video to fullscreen and check it out!


From a development standpoint, dropping the prefab into the scene was a breeze. After some selective renaming of cameras and connecting a few scripts, we were right there in it - riding the Tumbleweed Express. You can see from the footage it threw off our projectile launchpoint to a space above the caboose's turret (probably the result of interaction between our script calculating projectiles from a third-person mouse orbit and the "neck-height" magic of the Oculus prefab) - and of course our reticle disappeared since it's still keyed to the center of the screen and the GUI is pretty much lost. But the resulting feel? AMAZING. The depth really brings out the beauty of the Tumbleweed world and integrates well with our aiming mechanic (some of us don't want to go back to a mouse). The "aim-with-your-eyes" approach does make it difficult to switch back and forth between the front and back of the train so we'll get Sneaky Pete working on some sort of lever to bring the turret around faster than your neck can move.

Like many backers, we were disappointed to learn that "Unity Support" means "Unity Support (with Pro License)" but are grateful for the extension of the pro-trial to four months. Since upgrading the team to full licenses is somewhere in the range of college tuition or a new car, we experimented a bit with rolling our own dual-camera prefabs. Could we write our own scripts to read Oculus as a controller and simply output a 1280x800 view from two cameras? Splitting the screen for dual cameras is a pretty simple trick: under the Inspector Camera settings, use the "Normalized Rect View" to set the left camera W to 0.5 with X set to 0 right camera W to 0.5 with X set to 0.5 (i.e. make the cameras half as wide as the screen, and have the right camera view start at the midpoint of the screen). It's easy to see how this could be used in lots of games for handling multi-player on a single screen. With some key-commands to adjust the distance and rotation of the cameras, we were able to calibrate certain parts of the field of view into focus manually, but getting the whole thing in sync seems to depend on the "fisheye" lens-distorting you can see in the increasingly recognizable Oculus-view videos. The difference between the plugin and the roll-our-own dual screen was striking so much appreciation to the Oculus team for doing the heavy lifting! If you're reading this: thanks for keeping the SDK builds coming - we're hoping you're in talks with Unity to find a solution that will make it possible for indie devs to use it without breaking the bank.

Tuesday, June 18, 2013

Too Many Games: The Results


This past weekend a few of the Dirigiballers took our latest build to “Too Many Games”, which is an awesome convention just outside of Philadelphia. This was a major milestone for our team for many reasons. First, we hired two new developers (Duy Le and Ben Heard) this year and this build represents the first major release of their work alongside the continued efforts of our more senior team members. We saw the release of: (1) Track Switching, (2) Activate-able Bridges, (3) improved Dirigible behaviors and capabilities, (4) polished new menus centered around the improved Battle Menu that provides micromanagement of the players train, and (5) further integration of story and tutorial elements. I could go on about all the improvements, but let’s just say that we set our goals earlier this year and we exceed expectations.

Too Many Games: Pushing builds and playtesting!

The audience at the convention really seemed to enjoy all the new features and they provided ample feedback that we hope to incorporate into our next build shortly. It was a real pleasure to interact with the Philadelphia crowd, you guys really make game development worth it! I wanted to mention a few of the awesome indie developers that we got to speak with. The crew behind “Default Dan” was awesome to network with and their game is excellent. There was also a neat student project by the “The Automatic Gentlemen”, which was a great throwback to the platformer days of old though with an updated modern look and cheeky characters! Finally, a quick shout out to Horizon’s End and Broken Crown Games, LLC. Please check out these titles as well as all the other great Indies that attended the convention.

Too Many Games: A portion of our awesome audience and playtesters!

You might ask, what is next for the Dirigiballers? Well were still looking for support on our recently launched Steam Greenlight Concept page. We have an upcoming jam in two weeks where we will be setting our priorities for the rest of the year. We should also be working on updating our game trailer to show off the new content. We are really hoping to make it back to MAGFest and demo our planned co-op experience for the audience. In the immediate future, we will be bringing an intermediate build to “Indie Con DC”. This is a free and open to all ages event that is hosted by “Gaming in Public” and features many great Indie developers from around the DC area. The event will take place on August 3rd, 2013 at PUBLIC tenley.  Additionally, Indie developers can get in touch with the organizers to get their games into the event. Please come out and support all the organizations that are making this unique event possible!

Tuesday, May 21, 2013

Terp Indie Games Fest [Video]

Back in April we had a chance to talk about our game and what it was like on our team. We gave a presentation to the club and then demoed the game at their Indie Showcase with some other great local indie developers: e4Software, Omiya Games, and the guys from Broalition. The presentation was recently made available and is actually a pretty good summary of where we are at and where we think we're going at this point. If you have the time I highly suggest watching the video and checking out some neat indie projects here in the DMV area.


We would also thank the University of Maryland's Game Development Club for giving us the opportunity to speak with them. Good luck on your projects because we can't wait to check them out!

Sunday, May 5, 2013

The Dirigiballers are Going Full Steam Ahead!

The team is still hard at work making improvements to the game on all fronts. More updates will be coming soon, but for now heres what our awesome art team has been working on:

First, those crafty Dirigibles have a new "Dirigibomb" in their arsenal in an effort to squash that pesky train from meeting its destination:

  
Don't worry though, the train has also had some improvements, getting a tougher look and different compartments on the sides for marshals to help protect the cargo:


It will still be tough travelling the Badlands with all sorts of new challenges in front of the Tumbleweed Express, including a new heavily guarded draw bridge.


We are continuing to add new content every week, including new shootable props and environmental upgrades:


The Dirigiballers are still doing full steam ahead! Stay tuned for updates from the Code and Design teams. They are also working on some awesome stuff that'll take this game to a whole new level! :D

Friday, April 19, 2013

Presenting Badlands

After a lot of hard work, the Tumbleweed heads north. Presenting, 
Act 2:The Badlands!


Thursday, March 28, 2013

Unity C# AudioManager Tutorial - Part 4 (Music, Pausing, & Voice Over)

This is part 4 of a 4 part tutorial to create an audio manager for unity. This tutorial focuses on playing music, pausing fx while keeping music playing, and controlling sound volume including fading.

Part 1 | Part 2 | Part 3 | Part 4

Playing Music

We'll need a couple more key concepts to play music, but the first is easy. We want music to loop, so we can just call the PlayLoop method with our music clip. In order to distinguish the music from other sounds playing, we will create a member variable m_activeMusic in the AudioManager that will hold a reference to this particular AudioSource. Unless otherwise noted, all code in this tutorial is in our AudioManager class.
    private AudioSource m_activeMusic;
    public AudioSource PlayMusic(AudioClip music, float volume) {
        m_activeMusic = PlayLoop(music, transform, volume);
        return m_activeMusic;
    }
Notice that no transform parameter is passed in to identify the music position. Here I am assuming that in game music always plays at its given volume, and is not affected by any object movement in the game. To achieve this, we can to attach the music sound to the transform of the AudioManager, which, as explained in part 1, is attached to the camera, giving it a constant distance from the audio listener of 0.

The PlayLoop method adds the music sound to our m_activeAudio, but with m_activeMusic we can track this particular sound special, which we will utilize in the next section, fx pause control.

Pause Control

Now that we have a list of active sounds in m_activeAudio, we can pause them on command. With our reference to the music, we can indicate that the pause function only pauses all active sounds that are NOT the music:
public void pauseFX() { 
    foreach (var audioClip in m_activeAudio) {
        try {
            if (audioClip.source != m_activeMusic) {
                audioClip.source.Pause();
            }
        } catch {
            continue;
        }
    }
}

public void unpauseFX() {
    foreach (var audioClip in m_activeAudio) {
        try {
            if (!audioClip.source.isPlaying) {
                audioClip.source.Play();
            }
        } catch {
            continue;
        }
    }
}
Fairly straight forward- when AudioManager.Instance.pauseFX() is called, the method cycles through each of the active sounds, and if the current iterator is not the music, it calls Unity's built in 'AudioSource.pause' function. The try/catch block is to catch any timing issues where the audio source is destroyed while this is iterating through the list. If there are any issues on a given element in the list, the method catches the error and simply skips that element, and next time we pause or unpause, the ClipInfo object that errored out on this pass should have been removed in our updateActiveAudio method from part 3.

When the unpauseFX function is called, it goes through the active sounds, and if any are not playing, it plays them. If the audio is not paused and not playing, Unity automatically resumes them from where they paused. If you have any issues where sounds are restarting unexpectedly, this is the place to check first.

Voice Overs

To make sure we can clearly hear a voiceover, we're going to make all sounds that are currently playing quieter while the voiceover is playing. Similar to music, we create a member variable that tracks the active voiceover that is playing. Also like music, we assume that the voiceover is full volume regardless of object positions in the world, so we attach the voice over to the AudioManager transform (the camera.) We're also going to need a volumeMod variable that holds the amount to reduce all the other sounds' volume, and set it low when the voice over is started.
private AudioSource m_activeVoiceOver;
private float m_volumeMod = 1.0f;
public AudioSource PlayVoiceOver(AudioClip voiceOver, float volume) {
    AudioSource source = Play(voiceOver, transform, volume);
    m_activeVoiceOver = source;
    m_volumeMod = 0.2f;
    return source;
}
Now that we have m_volumeMod, we can revisit our updateActiveAudio method to add volume modification to all sounds. Before we loop through the sounds, we will check if m_activeVoiceOver is set, and if it is not, we will set the volume mod to 1.0 (normal volume.) Otherwise, we will keep it's current value, which should be set at 0.2 (as in the PlayVoiceOver method above). Then, when iterating through the active audio, we will check if the audio is our m_activeVoiceOver, and if it is not, we will make the current volume its default volume multiplied by the volume modifier. This makes all sounds but the voice over affected by the volume mod:
private void updateActiveAudio() {
    var toRemove = new List<ClipInfo>();
    try {
        if (!m_activeVoiceOver) {
            m_volumeMod = 1.0f;
        }
        foreach (var audioClip in m_activeAudio) {
            if (!audioClip.source) {
                toRemove.Add(audioClip);
            } else if (audioClip.source != m_activeVoiceOver) {
                audioClip.source.volume = audioClip.defaultVolume * m_volumeMod;
            }
        }
    } catch {
       Debug.Log("Error updating active audio clips");
       return;
    }
    //cleanup
    foreach (var audioClip in toRemove) {
        m_activeAudio.Remove(audioClip);
    }
}
There you have it. You can extend this type of pausing/volume modification functionality to additional AudioSource variables if you have other types of sound events in your game. You can also use the concept behind this volumeMod variable to create an in-game master volume slider for the player.

Fading Sound

As a final bonus feature, we can make the voice over modification fade the other sounds in and out instead of just snapping to the volume modification. This is a more minor trick, and it requires a few new variables, but it has a pretty significant effect, though subtle in execution.

First we'll have to add two new variables. A min volume variable to establish how low the volume should go during voice overs, and a voice over fade bool to indicate if we are currently fading for the voice over or not. We'll initialize these new variables in our Awake method.
private float m_volumeMod, m_volumeMin;
private bool m_VOfade; //used to fade to quiet for VO

void Awake(){
    Debug.Log("AudioManager Initializing");
    try {
        transform.parent = GameObject.FindGameObjectWithTag("MainCamera").transform;
        transform.localPosition = new Vector3(0, 0, 0);
    } catch {
        Debug.Log("Unable to find main camera to put audiomanager");
    }
    m_activeAudio = new List<ClipInfo>();
    m_volumeMod = 1;
    m_volumeMin = 0.2f;
    m_VOfade = false;
    m_activeVoiceOver = null;
    m_activeMusic = null;
}
We will update our Update method to gradually decrease the volumeMod to our min volume if our VOfade bool is true, and gradually increase the volumeMod to 1 if our VOfade bool is false. We will have the PlayVoiceOver method activate our VOfade bool, and have the updateActiveAudio method check the m_activeVoiceOver AudioSource and deactivate VOfade if it is null (if the voiceover is not currently active):
void Update() {
    //fade volume for VO
    if (m_VOfade && m_volumeMod >= m_volumeMin) {
        m_volumeMod -= 0.1f;
    } else if (!m_VOfade && m_volumeMod < 1.0f) {
        m_volumeMod += 0.1f;
    }
    updateActiveAudio();
}

public AudioSource PlayVoiceOver(AudioClip voiceOver, float volume){
    AudioSource source = Play(voiceOver, transform, volume);
    m_activeVoiceOver = source;
    m_VOfade = true;
    return source;
}

private void updateActiveAudio() { 
    var toRemove = new List<ClipInfo>();
    try {
        if (!m_activeVoiceOver) {
            m_VOfade = false;
        }
        foreach (var audioClip in m_activeAudio) {
            if (!audioClip.source) {
                toRemove.Add(audioClip);
            } else if (audioClip.source != m_activeVoiceOver) {
                audioClip.source.volume = audioClip.defaultVolume * m_volumeMod;
            }
        }
    } catch {
        Debug.Log("Error updating active audio clips");
        return;
    }
    //cleanup
    foreach (var audioClip in toRemove) {
        m_activeAudio.Remove(audioClip);
    }
}
Note that I am adjusting m_volumeMod by 0.1 each update. This struck a nice balance for me between having it happen quickly enough to still be effective, but slow enough to keep a smoothness in the transition.

Conclusion

You've reached the end of the tutorial! You should now have a straightforward audio manager that acts as a singleton, allows clip playing and control from anywhere, tracks active sound clips, pauses select sounds, fades select sounds, and is simple to modify for further functionality. I hope this provided insight into a way to more easily manage audio in your projects. If you have any questions or feedback, please leave it in the comments, or feel free to contact me at baheard@gmail.com. Special thanks to Herman Tulleken and Daniel Rodriguez for their related posts.

Friday, March 22, 2013

Unity C# AudioManager Tutorial - Part 3 (Control)

This is part 3 of a 4 part tutorial to create an audio manager for unity. This tutorial builds on the structure developed in part 1, expanding the functionality described in part 2. It describes new Play options, and how to manage tracked audio clips.

Part 1 | Part 2 | Part 3 | Part 4

Overloading Play

The next step is to create a play method that plays a sound on top of an existing object, so when the object moves, the sound moves with it. This is useful for things such as a car with a siren, or a character who is walking while they talk. This is another core method, and similar to our previous play method. Again, the concept is referenced from Daniel Rodriguez's helpful post. Except where specified otherwise, all methods in this section of the tutorial are within our AudioManager class.
    
public AudioSource Play(AudioClip clip, Transform emitter, float volume) {
    var source = Play(clip, emitter.position, volume);
    source.transform.parent = emitter;
    return source;
}
Note that instead of a Vector3 parameter, we pass in the GameObject Transform that is emitting the moving sound. This method calls the default play method, creating an object at the emitter position and playing the sound there, but it then attaches the transform of the AudioSource (which is shared by its GameObject) to the emitter object by making the emitter its parent. Now the sound will follow the emitter where it goes. Remember that the original Play method registers the new sound object with the m_activeSounds collection, and destroys the GameObject after the length of the sound has played.

Looping Sound

Since the original play method destroys the sound object after the length of the clip, to loop we need a new method that won't destroy it. It also has to set the audiosource "loop" property to true. I assumed that any sound that loops will have an emitter, but if you needed a looping sound that played in one position in space, you could just remove the line that sets the transform.parent. This method is almost identical to the original except for these changes.
public AudioSource PlayLoop(AudioClip loop, Transform emitter, float volume) {
    //Create an empty game object
    GameObject movingSoundLoc = new GameObject("Audio: " + loop.name);
    movingSoundLoc.transform.position = emitter.position;
    movingSoundLoc.transform.parent = emitter;
    //Create the source
    AudioSource source = movingSoundLoc.AddComponent<AudioSource>();
    setSource(ref source, loop, volume);
    source.loop = true;
    source.Play();
    //Set the source as active
    m_activeAudio.Add(new ClipInfo{source = source, defaultVolume = volume});
    return source;
}
The setSource method becomes valuable now, because if we want to change any default settings of all the AudioSources that are created through the AudioManager, we only have to change it in the setSource method, and it will updated both this and the original Play method.

Stopping the Looping Sound

Now we've got a looping sound going on endlessly, we need to be able to stop it! This is a simple method that requires you to track the sound you'll want to stop at start time, and pass it in as a parameter when you're ready to stop it.
public void stopSound(AudioSource toStop) {
    try {
        Destroy(m_activeAudio.Find(s => s.source == toStop).source.gameObject);
    } catch {
        Debug.Log("Error trying to stop audio source "+toStop);
    }
}
This highlights why it is useful to have all the Play methods return the AudioSource created. Here is an example of a new Init class using the loop and stop methods:

public class Init : MonoBehaviour {
    //testSound is public in order to set in the inspector
    public AudioClip testSound; 
    private AudioSource playingSound;

    void Start(){
        playingSound = AudioManager.Instance.PlayLoop(testSound, m_enemy.transform, 1)
    }

    void Update(){
        if(Input.GetKeyDown(KeyCode.Space)){
            AudioManager.Instance.stopSound(playingSound);
        }
    }
}
Note that since loop sounds are assigned to a parent on creation, if that parent is destroyed for any reason, the sound will be destroyed with it automatically.

Cleaning Up the Audio List

For the final section of this tutorial, I will describe the mechanism for cleaning up inactive ClipInfo objects from our m_activeAudio list. This method will also be key later to control the sounds dynamically.
private void updateActiveAudio() { 
    var toRemove = new List<ClipInfo>();
    try {
        foreach (var audioClip in m_activeAudio) {
            if (!audioClip.source) {
                toRemove.Add(audioClip);
            } 
        }
    } catch {
        Debug.Log("Error updating active audio clips");
        return;
    }
    //cleanup
    foreach (var audioClip in toRemove) {
        m_activeAudio.Remove(audioClip);
    }
}
The method creates an empty list of ClipInfo to remove. We can't remove them in the foreach loops since it would illegally modify the iterator. The method then goes through all the ClipInfos in m_activeAudio and checks each one's AudioSource. In the Play method the AudioSource was set to destroy after playing, so after the sound is finished, the AudioSource source of the ClipInfo will be null. If it is null, we add it to the toRemove list to be removed. After going through all active sounds, we go through all the toRemove ClipInfos and remove them from the m_activeAudio list. Since the ClipInfo list is not directly tied to the AudioSource it holds, this will work no matter how the AudioSource is destroyed (time or parent death.)

Lastly we have to call this in the AudioManager Update() method so that it will be called continuously.
void Update() {
    updateActiveAudio();
}

Next time...

We now have a working AudioManager that will play a sound at a location, play a sound at an emitter, play a looping sound, stop a looping sound, track all active sounds, and clean them up as they finish. In part 4, I will show how this setup allows for dynamic centralized control, including implementing music, pausing non-music sounds, global volume control, and select volume control (for things like voice overs.)

Friday, March 15, 2013

Unity C# AudioManager Tutorial - Part 2 (Play)

This is part 2 of a 4 part tutorial to create an audio manager for unity. This tutorial focuses on creating the main methods that will play sounds, as will as tracking and managing active sounds.

Part 1 | Part 2 | Part 3 | Part 4

AudioManager - ClipInfo Object

We will first create a ClipInfo object as a new data type to hold all the relevant data about each sound that is handled by the audio manager. Right now it contains only variables for the sound clip to play and its initial volume, but it could be expanded to hold any information you want to keep track of, such as the time the clip started playing, or how many times it has looped. We will add a member variable List of this ClipInfo to our AudioManager to track all audio playing, and we will update our Awake method to initialize this List.
public class AudioManager : Singleton<AudioManager> {
    class ClipInfo
    {
       //ClipInfo used to maintain default audio source info
       public AudioSource source { get; set; }
       public float defaultVolume { get; set; }
    }

    private List<ClipInfo> m_activeAudio;

    void Awake(){
       m_activeAudio = new List<ClipInfo>();
       
       [see previous tutorial]
    }
}
First note that the ClipInfo class is inside the audio manager. This allows it to be accessed only by the audio manager, hiding the data. You can read the rules on nesting classes here.

Second, notice that ClipInfo holds the AudioSource directly, ignoring the GameObject that the source must be attached to.

Lastly, we create a 'defaultVolume' property so that we can change the volume of the audio source dynamically, but remember what volume it was created at. More on this in part 4.

The Play Method

For the core functionality of this AudioManager, I’ve referenced Daniel Rodriguez for the basic idea (I also recommend his post on setting up managers for your unity projects.) The Play method of the AudioManager will:
  1. Create a new GameObject.
  2. Set its AudioSource to be our given sound clip.
  3. Play the AudioSource.
  4. Destroy the object.
The beauty of this is that we can play a given audio clip at any time by writing AudioManager.Instance.Play(parameters). We don’t have to worry about creating the AudioManager since it is a singleton, we don’t have to worry about creating and destroying the accompanying GameObjects because everything is handled within the method.
    public AudioSource Play(AudioClip clip, Vector3 soundOrigin, float volume) {
       //Create an empty game object
       GameObject soundLoc = new GameObject("Audio: " + clip.name);
       soundLoc.transform.position = soundOrigin;

       //Create the source
       AudioSource source = soundLoc.AddComponent<AudioSource>();
       setSource(ref source, clip, volume);
       source.Play();
       Destroy(soundLoc, clip.length);
       
       //Set the source as active
       m_activeAudio.Add(new ClipInfo{source = source, defaultVolume = volume});
       return source;
    }
For sound data, the method takes an audio clip and a volume value as parameters, but could be extended to take other parameters to modify the sound, such as pitch.

The other parameter here is the Vector3 that indicates the position of the sound. This is where the sound is playing from, and uses Unity’s built in sound management to determine the panning and volume of the sound based on the position of the audio listener component in your scene and the rolloff for the audio source (more in rolloff in a little bit.)

This isn’t a long method, and it is the most critical one, so I will step through the code.
   //Create an empty game object
   GameObject soundLoc = new GameObject("Audio: " + clip.name);
   soundLoc.transform.position = soundOrigin;
This creates an empty GameObject in the world. When running the game, this will show up in the inspector as “Audio: [whatever your clip name is as listed in the Unity assets]”. It then moves this newly created object to the Vector3 position passed in.

Next we attach an audio source to the fresh GameObject we just created:
   //Create the source
   AudioSource source = soundLoc.AddComponent<AudioSource>();
   setSource(ref source, clip, volume);
   source.Play();
   Destroy(soundLoc, clip.length);
After creating the AudioSource, we pass a reference of it to ‘setSource’, which I will outline shortly. Basically this method takes the values passed in and applies them to the AudioSource of our newly created GameObject. We start the AudioSource playing, then call the Destroy method on the new GameObject, passing clip.length as the parameter of how long to wait before destroying the object. Since clip.length is the time it takes to play the clip, this will destroy our AudioSource GameObject immediately after finishing the sound. This is essentially like playing a one shot of an AudioClip, but since it is an AudioSource, we can do more things with the clip, such as changing it’s volume while it is playing, or pausing it, which we will take advantage of later.

Lastly, we register this audio source with the AudioManager as a ClipInfo object which we created earlier. This way the AudioManager tracks the sound and can handle it as it is playing.
   //Set the source as active
   m_activeAudio.Add(new ClipInfo{source = source, defaultVolume = volume});
   return source;
Since ‘source’ and ‘defaultVolume’ are public properties of our ClipInfo object, we can assign them using object initializers (using the curly braces), which allows us to avoid the need for an explicit constructor. We add the new ClipInfo object to our AudioManager member variable List m_activeAudio, which maintains references to all the sounds that are playing.

setSource Method

For the final part of this section of the tutorial, we will create the “setSource” method referenced above in the “Play” method. This method sets the properties of our new audio source.
private void setSource(ref AudioSource source, AudioClip clip, float volume) {
   source.rolloffMode = AudioRolloffMode.Logarithmic;
   source.dopplerLevel = 0.2f;
   source.minDistance = 150;
   source.maxDistance = 1500;
   source.clip = clip;
   source.volume = volume;
}
The AudioSource is sent in as a ‘ref’, so that all changes made to the AudioSource parameter passed in will be kept after this method is finished and our ‘Play’ method resumes.

Rolloff mode is the way that Unity makes the sound decrease in volume as its distance from the AudioListener in the scene increases. In the inspector you can see a graph that models this.

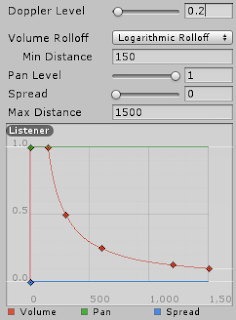
The Linear mode means that the sound decreases at an equal rate as you get further from the listener. The Logarithmic mode means that the sound decreases sharply as you begin to move away from the listener, but the farther you get away from the listener, the less the sound decreases. I opted for Logarithmic sound because it more closely matches the way you hear sounds in reality- a noise made at 10ft away will sound much louder than the same noise at 100ft away, but a noise at 500ft away will sound only slightly louder than the same noise at 800ft away.

The dopplerLevel is related to how the sound is affected by movement (like sirens on a passing ambulence.) I set this to .2 because I found that the default value of 1 can create strange sound anomalies when rotating the camera quickly.

minDistance and maxDistance are important, particularly for Logarithmic rolloff.

minDistance is how far the sound must be from the listener before the volume starts to decrease. This is especially important because if this is set to its default 0, the sound will start to drop off sharply at any distance from the listener. This means that a sound made at 1ft away will be significantly louder than a sound made at 2 ft away, which just does not feel right in-game. For Tumbleweed, a distance of 150 seems to be working for now- all sounds less than 150 game ‘units’ away will play at max volume, and after that the sound dropoff will begin.

maxDistance is important because it determines both the maximum distance at which a sound will play, as well as the curve of sound dropoff. With logarithmic rolloff, you can make this number really huge, and sounds that play in the far distance and middle distance will still sound natural.

Finally, we set the sound clip to our clip, and the default volume to our volume.

We covered a lot here. If set up correctly, you should now be able to play any AudioClip by calling “AudioManager.Instance.Play(AudioClip, Vector3, float)” with your desired clip, position, and volume.

Here is a my project setup and in-game hierarchy in Unity so far:

Next time...

In part 3 of the AudioManager tutorial, I will cover placing moving sounds on moving objects, pausing sounds, and changing volumes.

Tuesday, March 12, 2013

Unity C# AudioManager Tutorial - Part 1 (Setup)

This is part 1 of a 4 part tutorial to create an audio manager for Unity 3d. This tutorial focuses on the initial setup of the singleton and audiomanager classes.

Part 1 | Part 2 | Part 3 | Part 4

Handling Sound in Unity

Default Unity sound control is clumsy. GameObjects can only have one AudioSource as a component. AudioClips are inflexible. In these posts, I describe an audio manager that is simple to use, easy to organize, and adds versatility to the Unity sound tools, building on its existing structure. This includes playing audio clips dynamically with full control, tracking sounds that are currently playing, pausing select sounds, and controlling volume dynamically. This tutorial assumes you have a basic understanding of sound handling in Unity, check out the manual for an overview.

Singleton

First off, we need the singleton. For this, I’ve referenced the article 50 tips for working with unity. I recommend reading this in its entirety- you don’t have to agree with everything, and you don’t have to absorb every detail, but it’s good think about these things!

The premise of the singleton is that you have a single object which can be accessed at any time, without explicit instantiation, and you know that the instance you are accessing is the sole instance of the singleton object. It works through a static method which calls the stored instance of the object. Inside the method, the singleton checks if the instance exists and returns it. If it does not exist, it creates one and returns this. From the outside, though, it seems as if the single instance is always available.

The great benefit to this for our AudioManager is we do not have to manage a GameObject for it for each scene. We simply have each sound clip to play call the AudioManager, and if the instance doesn’t exist, the singleton creates one, and if it already exists, the singleton uses the existing one, so there is no threat of creating multiple audio manager instances in one scene, and we don’t have to concern ourselves with its existence.

using UnityEngine;
using System.Collections;

public class Singleton<T> : MonoBehaviour where T : MonoBehaviour {
    protected static T instance;

    //Returns the instance of this singleton
    public static T Instance {
        get {
            if (instance == null) {
                instance = (T)FindObjectOfType(typeof(T));
                if (instance == null) {
                    GameObject container = new GameObject();
                    container.name = typeof(T)+"Container";
                    instance = (T)container.AddComponent(typeof(T));
                }
            }
            return instance;
        }
    }
}
The T listed represents a generic type, which allows you to create singletons of various types by inheriting this class. In the context of this post, though, we will only be using it for our AudioManager.

Also note that the Singleton inherits from MonoBehaviour, which allows us to implement any of its subclasses as components on GameObjects.

You can google the Unity command “DontDestroyOnLoad” to see how to make a GameObject persistent across scenes, but I am not putting it in this base class since we may not want all derived classes persistent across scenes. For example, in our AudioManager, we do not need a persistent GameObject.

AudioManager - Initialization

To begin, we will initialize our new AudioManager class using Awake(). We use this instead of Start() because we want to make sure our AudioManager is available first thing in the scene, in case there are any sounds that start playing immediately (like music.)

using UnityEngine;
using System.Collections;
using System.Collections.Generic;

public class AudioManager : Singleton<AudioManager> {
    void Awake() {
        Debug.Log("AudioManager Initializing");
        try {
            transform.parent = GameObject.FindGameObjectWithTag("MainCamera").transform;
            transform.localPosition = new Vector3(0, 0, 0);
        } catch {
            Debug.Log("Unable to find main camera to put audiomanager");
        }
    }
}
We start by creating a message logging the AudioManager initialization. Next, we try to attach the AudioManager to the main camera, placed within a try/catch block so that we can log any issue finding the main camera or attaching this object. This may be something worth playing around with if your AudioListener isn’t always on your main camera, or you don’t tag your game camera with the “MainCamera” tag, but for Tumbleweed this works.

Setting the ‘transform.parent’ property of the object makes it appear under the parent object in the scene hierarchy while running the scene. It helps organize your hierarchy, but more importantly, all transforms (movement) of the parent GameObject will also apply to its children (and its children’s children.) This way, the AudioManager will stick to the camera like a cat to a tree. Now we can attach certain sounds (like music) to the AudioManager itself, and know that it will stay on the camera, which means it will not change volume or pan position unless we explicitly instruct it to.

Initializing AudioManager in a scene:
  1. Any script makes a call to AudioManager.Instance (eg var AM = AudioManager.Instance).
  2. The Singleton base class checks for an instance of AudioManager.
  3. Not finding an instance, the Singleton creates a new AudioManager GameObject and attaches the AudioManager component (script.)
  4. The AudioManager script Awake() method searches for the main camera (with the “MainCamera” tag.)
  5. Finding it, it attaches itself to the main camera by making the camera its parent.
Now we have an AudioManagerContainer GameObject with an AudioManager component, and it is a child of the MainCamera. At this point, if you have set these classes up correctly, you should be able to call this in your scene, though it does not do anything yet. You need a GameObject in the scene with the "MainCamera" tag. If you write "var AM = AudioManager.Instance" on the Start() method of any object in your scene, you should receive a Console message that reads "AudioManager Initializing." If you successfully receive this message, you are ready to move on to part 2.

Next time...

In part 2, I will create a Play method, and will discuss some of the controllable attributes of sounds in Unity.

Friday, February 22, 2013

RoboHeart Released for iPad!

We're super proud to say we have completed the Apple review process for our Global Game Jam 2013 Project:
RoboHeart Title Screen
RoboHeart: https://itunes.apple.com/us/app/roboheart/id598290014?mt=8


When we conceived this game we envisioned it running on a touch pad device and we're really happy we were able to release the game in a free to play setting. Other than the necessary steps to get the game up on the iStore, this game is more or less exactly as it was at the end of the 48 hour jam that it was created in. We made the design choice to release only for iPad, because we had limited time on our Global Game Jam provided Unity Licenses and the recent upgrades to iOS 6.0 on our development device made things difficult. It is awesome just to have this project out, especially because we're about to go into our February jam session on Tumbleweed Express - positive team confidence booster right before starting an epic weekend!

RoboHeart: The Pulse!
Simple instructions: drag the robot arm on the left bot back to aim, release in the direction you want, and tap the screen once to initiate a pulse and again when it is over an power up you want to use or to cancel the pulse and start again. Instructions are in the top left corner, the top right corner is your time limit. There are a total of 9 levels to play through. Unfortunately the game is "AS IS" because our licenses situation.... what are you going to do? Enjoy!

Wednesday, February 20, 2013

Train Upgraded!

Made some tweaks to the train engine. Got the new animated wheels added and put some realistic textures to it. Don't worry, she'll go much faster once we put her on the tracks :P More updates soon!

Tuesday, February 5, 2013

Bandito Animation!

Decided to play with animation today. I have never really rigged and animated anything before, so its still pretty shaky. I thought it was good for my first try Progress! :P
This is only a portion of a new enemy we are introducing. More details coming soon!

Sunday, February 3, 2013

Global Game Jam 5 (2013)

This is Ben Heard, I’m joining the Dirigiballers to help with programming on Tumbleweed Express. You can learn more about me at www.baheard.com. I wanted jump in and write a blog entry to introduce myself, and also to write about Global Game Jam 2013. This event was both my first chance to work with some of the Dirigiballers as well as my first game jam experience.

Global Game Jam

If you’re on the fence about going to a game jam, I definitely recommend trying it out because It is both fun and free! I’m not sure if I’ve ever had as much fun at a free event that lasted all weekend as I did attending the Global Game Jam. Everyone at the event was really friendly, which included a solid turnout of members from IGDA DC.

The weekend was not only really fun, but also an intensive learning experience. I went in with a limited knowledge of Unity, and came out feeling like I could make anything. I was surprised at just how easy it is to rapidly develop using Unity and how effectively my knowledge of C# plugged right in. The software is fast, powerful, but also seems deep and extensible.

Day 1

After an initial design brainstorm, we locked in on an idea that would become “Roboheart”, based on the 'heartbeat' theme for the weekend. The game is puzzle based, and the basic idea consists of one robot trying to throw his robot heart to another in a space station. While in the air, the player can activate the heart by clicking the mouse. Activating the heart emits a ‘pulse’, which is an expanding circle like a radar pulse. If the player clicks again while the pulse is over a powerup (or multiple powerups), the powerup is consumed and its effects immediately applied. For example, the main powerups are force vectors, which, when activated, move the heart in the direction the vector is pointing. We had a lot of ideas for powerups, but it turned out the force vectors create a wide variety of potential challenges, so we focused on puzzles with these, as well as an one that reverses the gravity for the heart. After deciding on the basic idea, we broke out to work on our parts.

RoboHeart Pulse!

It was pretty surreal the first night to go to bed at 4am after crunching out the initial mechanics. I layed out my sleeping pad and bag under the flourescent lights of the computer lab, hiding my head under an unused table to help block the light, put in my earplugs, and grabbed some sleep while a few others continued to clack away on keyboards.

Day 2

GGJ 2013 Dirigiballers
Waking up a few hours later, it was straight back to coding, which was like a dream. Matt was up when I went to sleep, and he was up when I got up, except now he was wrapped in a blanket. Getting the latest build from our SVN server,  I started to see the art assets that Jake and Andy had been working on integrating into the game, and what a difference it made! All of a sudden the game, which so far was just numbers and events, starts to have colors and art out of the blue! How cool is that. I think that was the coolest part of the game jam - everyone working at their parts, and the whole game coming together, feeling some ownership of something you could never have done alone.


Day 3

We had scoped our project well, and were ahead of schedule, so we were able to dedicate most of our third day to testing and polish (menus, sound, etc). The presentations on Sunday were really fun, it was great to see what everyone else had been working on alongside us.

The most popular game of the weekend was called Heartline. It is a two player co-op local multiplayer sidescroller puzzle game. The player holding the heart has special abilities, but can pass it to the other to help get both players through obstacles. The nature of the puzzles reminded me of Portal 2 co-op. The game featured simple, but effective, 2d art.

The game that really stood out to me, though, was called Heartdropper. The main mechanic was that tweets to @heartdropper made powerups drop in-game. The main programmer on this project said he used the Twitter API to read tweets and store them in a MySql database using PHP. The game the then read the tweets from the database to create the powerups in the game. I'm definitely interested in seeing where they take this.

The weekend was a blast and I’d recommend it to anyone with an interest in making games - this is definitely a great place to start. The main point of the even is to set aside a weekend to collaborate, learn, manage, structure time, and produce something as well generally promoting the craft. I’ll definitely be attending the Global Game Jam next year and I’m already wondering: what game will come out of it next?

Roboheart will be available on the app store in the next couple of weeks if you have an iPad, or you can play the game online with the Unity player at:
Unity Player Version


Saturday, February 2, 2013

Photos from Onyxfest

This weekend we had an oppertunity to present Tumbleweed Express at Onyx Fest, which was arranged by Pink Onyx Games and the UMBC's Game Development Club on the UMBC campus. Our very own Greg Morningstar and Jake Clayman gave a brief presentation about our process while working on Tumbleweed Express and, following lunch, the audience was able to take control of the Tumbleweed and shoot down some baddies! Here are some photos from the event:


Friday, February 1, 2013

Happy Friday!

Hope everyone is having a good Friday. I'm sure we'll have way more updates in the near future, but today I wanted to have some fun. Brushing up on my low poly and texturing skills :P
Hope you guys like it!

Thursday, January 24, 2013

New Cannon Model

Here's a look at the new animated standard cannon and dome models that have replaced the old simple ones!

Monday, January 21, 2013

Tumbleweed Express page on Facebook!

There is now a page for Tumbleweed Express on facebook! Give us a "Like"! :)
https://www.facebook.com/TumbleweedExpress

Gatling Gun!

A composite Gatling Gun and Standard Cannon that shows off a new/higher quality weapon style and supports future implementation of primary/secondary firing modes.

Friday, January 18, 2013

Art - What is to come?

Good afternoon! I would like to give you all a quick update on things!

The Dirigballers are always busy with trying to improve the current assets and at the same time add more player-weapons, and enemies! So get excited everybody because other than adding game design related content that your feedback provided, we will also be adding awesome new visual changes, new weapons and new enemies! We can't wait to show these to you! Stay tuned for art previews! And as Sneaky Pete would say, WEEEEEEEEEEEEEE!

Thursday, January 17, 2013

As Asked

MAGFest's most requested feature was some kind of radar system. I am proud to say that you asked and we listened, here is a preview:


New Radar: 1st version of a fixed orientation radar system. Measured from
the engine (green), enemies (red) are always shown with the top representing the
forward direction of the trains current orientation.
We'll be stylizing and working on the implementation during our upcoming design meeting, but the functionality is great.

Sunday, January 13, 2013

MAGFest: Most Discussed

MAGFest Newsletter Banner
Playtesters at MAGFest played 196 games of Tumbleweed Express and generated 259 unique items that include: feedback, feature requests, bugs, and user experience issues. After cataloging these issues, here is the top 20 items:
  1. Add Radar; could be a purchasable option (14)
  2. Boss fight needs more indicators relating where to shoot; and more colliders (8)
  3. Destructable Spawners (8)
  4. Mouse Sentivity needs to be adjustable (7)
  5. Iterate on design of battle men; it's a little confusing (6)
  6. Weapon switching is slow and cumbersome (5)
  7. Put on Steam; with achievements (4)
  8. Drillcars are very aggressive (4)
  9. Track switching; and destination control (4)
  10. Multiplayer and/or co-op  (4)
  11. Assignments for crew via the shop is not intuitive (3)
  12. Chain gun feature with or without Cool down rate, spin up rate (3)
  13. SoundFX make hearing voiceovers very difficult (3)
  14. Drillcar Jim's health stays on the screen after abandoning the town (3)
  15. Switch weapons via number keys; not everyone has or likes mouse wheel (3)
  16. Train cars (Cannons?) are inaccurate (3)
  17. Not obvious why the train stops when the engine is dying (3)
  18. Add Minimap (3)
  19. Make prices and cash more noticeable (3)
  20. Consider doing a train on train battle of the line style level/encounter (3)
Feel free to leave questions, comments, or feedback in general in the comments section below.

Wednesday, January 9, 2013

Dirigiballers Breaking It Down! Part 2

Just in case you needed more proof that the team can really break it down!

Dirigiballers Breaking It Down! Part 1

We work hard and play even harder!
(For the record neither one of us had played this game until MAGfest)

Tuesday, January 8, 2013

Tumbleweed Express MAGFest Trailer


Newest Tumbleweed Express trailer, uploaded in 1080p!
This trailer features all the recent content built for our demonstration at MAGFest.

Monday, January 7, 2013

The Dirigiballers are now on Twitter!

Follow the Dirigiballers on Twitter here: @drigiballers :)

Dirigiballers at MAGFest!

Partial team photo. Front: Andy 
LtoR: Matt, Greg, Keelan, David, and Jake
In spirit: David To, Arnoud, and Sam!
This past weekend has been so awesome for the team! We were able to show off a really nice demo of the game to a great audience at the Music and Games Festival (MAGFest) annually held at the National Harbor. We were all nervous about how people would receive the new updates, especially the final boss Drillcar Jim.

As people made their way to the Indie games area, we could see a lot of interest from people when they saw the newly designed intro screen at our booth. After some persuasion from the team, several patrons of the event sat down and played. Once players saw the train and got behind the main turret, their faces instantly lit up as they began to shoot anything in sight while the train chugged along through the desert and mechanical bits of blown up enemies. It was amazing to see that people were having fun with something that we all worked so hard on.

Some of the first players to play Friday afternoon.
One thing that we wanted to fix at this release that we saw as an issue at Artscape was the shop and assignment screens. After working tirelessly these past couple of months, a lot of confusion had disappeared, and several players easily understood the concept of using these elements strategically in order to make it to the end of each level.

Still going strong on Sunday.
Another concern we had coming into this weekend was with the captivation of each level. But that concern was quickly forgotten as we saw players going through not only a couple of levels, but making it all the way to the boss and wanting more! At some moments of the event, we had people waiting to play our game! It was truly heart warming to see.

Audience at the table on Saturday.
Of course the game was not perfect, but with each player we got amazing feedback on how to make the game more enjoyable. After a much deserved break from development, we will sit down and pour through the notes and see what changes and additions we will implement next to make a greater game experience.

A fraction of the generated notes.
From the bottom of our hearts we would like to thank every single person who played Tumbleweed Express. Though we created this game from our own ideas and motivations, everyone on this team wants to make a fun game for everyone to enjoy. Thanks MAGFest for assisting with the creation of our game, you guys truly rock!

Western steampunk approved!